This article is intended for users who are hosting with ChemiCloud and utilising the WordPress hosting services provided by them. It also includes information on how to install the Elementor page builder and the Hello theme during this process. Below, we outline the most efficient method to install WordPress, Elementor and the Hello theme with ChemiCloud.
Step 1
Log into your ChemiCloud Hosting Account
Log into your ChemiCloud hosting account by visiting the login page and entering your details.

Step 2
Choose the cPanel Option
One you have completed logging into your account, you will see the ‘cPanel’ icon (shown below), simply click on this icon to open the cPanel.

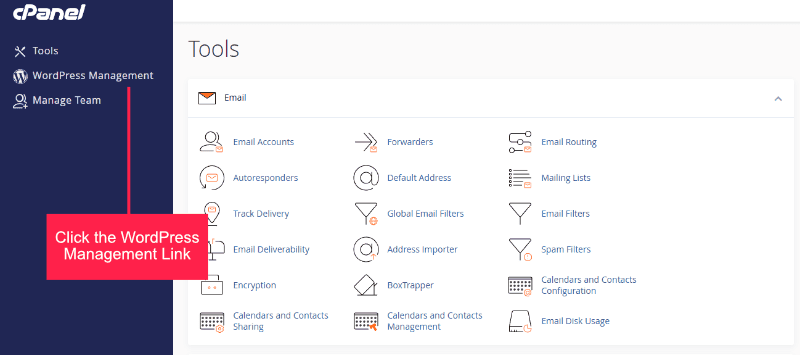
Step 3
Select the WordPress Management Option
Once in the cPanel, you will see a screen similar to the below image. Simply click the ‘WordPress Management’ option and a new screen will appear.
Step 4
Select the Install Button
After clicking the ‘WordPress Management’ option, you will be shown the ‘WP Toolkit’ page. To begin the installation process, click the ‘Install’ button.

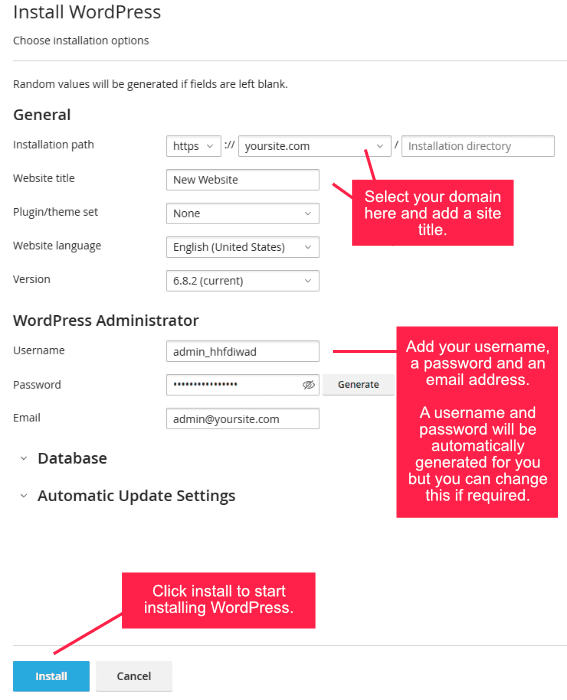
Step 5
Choose the Installation Options
After selecting the ‘Install’ button, you will be presented with the installation options. You will see on the image below, several options will need to be completed to complete the process. A brief breakdown of these options:
- Installation Path – Choose your domain name and if you wish to install this WordPress install to a folder, then add the name of the folder you would like to install to. If this will be your main website, then leave the ‘installation directory’ blank.
- Website Title – Add a title for your website in this field. As an example, if your business sells computers in London, then the title could be ‘Number 1 for Affordable and Reliable PC’s in London’. You can also leave this blank and add a title later.
- Plugin/Theme Set – ChemiCloud provides several options for choosing a theme and various plugins, for now we will leave it at the default setting ‘none’.
- Website Language – Select your language here.
- Version – This enables you to select the version of WordPress to install, best to leave this at the default setting.
- Username – Enter your username here. You will notice that a username will be automatically created for you, so use this or add your own version.
- Password – Add a login password here, a password will be automatically created, but you can add your own if required. If adding your own password, make sure that it is a strong password, aim for a length of at least 12-16 characters, and include a mix of uppercase and lowercase letters, numbers, and symbols. Tip: You can use the ‘Generate’ button to create a new password for you, and then you can add a few more characters to strengthen it.
- Email – Add your email address.
- Install – Click the install button to start installing WordPress.
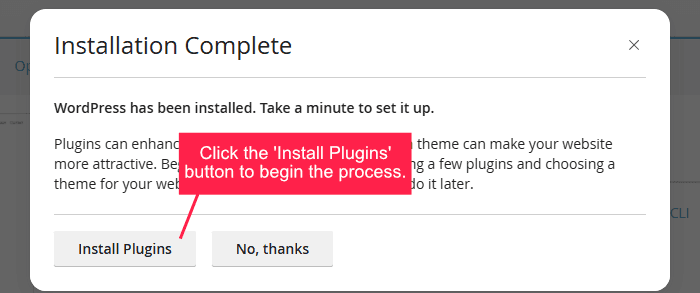
Step 6
Installation Complete
After a few minutes your WordPress website will be installed and you will be presented with the ‘Installation Complete’ message. For this example, we will be adding the Elementor page builder and the Hello theme with our installation. To begin, choose the ‘Install Plugins’ option (as shown in the image below).
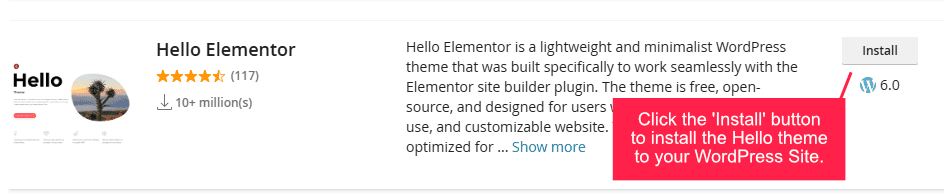
Step 7 – A
Install Elementor Page Builder
After clicking the ‘Install Plugins’ button (shown above), find the Elementor Page Builder plugin and click the ‘Install’ button (see image below) to install the free version of Elementor to your WordPress site.

Elementor will begin the installation process and when completed, you will see confirmation of this (see image below).

Step 7 – B
Install Hello Theme
Once Elementor is installed, you can start to install the Hello Theme which is created by the Elementor team, so will work perfectly with Elementor. First of all, change the tab from Plugins to Themes (see image below).

Once you have switched the tabs, find the Hello theme and click the ‘Install’ option and begin the install hello theme process.

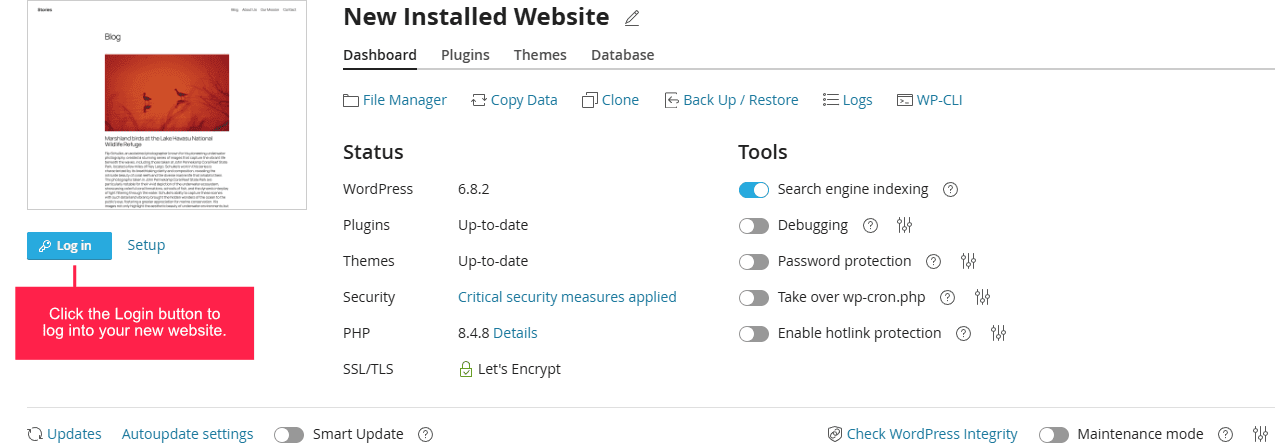
Step 8
New Installed Website
When you have completed the installation of the plugins, then you will see the installed websites screen. This will show you the installed website and provide various options and information (see image below). To log into your website, simply click the ‘Log In’ button.
All Done
Should you require any further guidance or assistance, please do not hesitate to reach out to us directly, or feel free to ask any questions using the comments section below.